| The Battle of Arnhem was a famous Second World War military engagement fought in and around the Dutch towns of Arnhem, Oosterbeek, Wolfheze, Drieland the surrounding countryside from 17–26 September 1944. After sweeping through France and Belgium in the summer of 1944, the Allies were poised to enter the Netherlands. Field Marshal Bernard Montgomeryfavoured a single thrust north over the branches of the Lower Rhine river, allowing the British 2nd Army to bypass the German Siegfried Line and attack theRuhr. To this end, the Allies launched Operation Market Garden on 17 September. Paratroopers were dropped in the Netherlands to secure key bridges and towns along the Allied axis of advance. Farthest north, the British 1st Airborne Division, supported by men of the Glider Pilot Regiment and the Polish 1st Independent Parachute Brigade, landed at Arnhem to secure bridges across the Nederrijn. Initially expecting a walkover, British XXX Corps planned to reach the British airborne forces within two to three days. The British forces landed some distance from their objectives and were quickly hampered by unexpected resistance – especially from elements of the 9th SS and 10th SS Panzer Divisions. Only a small force was able to reach the Arnhem road bridge while the main body of the division was halted on theoutskirts of the city. Meanwhile, XXX Corps was unable to advance north as quickly as anticipated and failed to relieve the airborne troops according to schedule. After four days, the small British force at the bridge was overwhelmed and the rest of the division became trapped in a small pocket north of the river – where they could not be sufficiently reinforced by the Poles or XXX Corps when they arrived on the southern bank, nor by the RAF's resupply flights. After nine days of fighting, the shattered remains of the airborne forces were withdrawn in Operation Berlin. With no secure bridges over the Nederrijn, the Allies were unable to advance further and the front line stabilised south of Arnhem. The 1st Airborne Division had lost nearly three-quarters of its strength and did not see combat again. Main article: Operation Market Garden By September 1944, Allied forces had successfully broken out of their Normandy bridgehead and pursued shattered German forces across northern France and Belgium. Although Allied commanders generally favoured a broad front policy to continue the advance into Germany and the Netherlands, Field Marshal Bernard Montgomery proposed a bold plan to head north through the Dutch Gelderland, bypassing the German Siegfried line defences and opening a route into the German industrial heartland of the Ruhr. Initially proposed as a British and Polish operation codenamed Comet, the plan was soon expanded to involve most of the First Allied Airborne Army and a set piece ground advance into the Netherlands, codenamed Market Garden. Montgomery's plan involved dropping the U.S. 101st Airborne Division to capture key bridges around Eindhoven, the 82nd Airborne Division to secure key crossings around Nijmegen, and the British 1st Airborne Division, with the Polish 1st Independent Parachute Brigade attached, to capture three bridges across the Rhine at Arnhem. Although Lieutenant-General Lewis H. Brereton commanded the First Allied Airborne Army, his second in command Lieutenant-General Frederick Browning took command of the airborne role. The British Second Army, led by XXX Corps would advance up the "Airborne corridor", securing the Airborne Division's positions and crossing the Rhine within two days. If successful the plan would open the door to Germany and hopefully force an end to the war in Europe by the end of the year. British plan 
The planned British landings and defence at Arnhem. Further information: Operation Market Garden order of battle With the 6th Airborne Division still refitting after Operation Tonga, the task of securing the Rhine Bridgehead fell to the 1st Airborne Division under the command of Major General Roy Urquhart. The division was made up of three brigades of infantry (two parachute, one glider borne), supporting artillery and anti-tank batteries and substantial Royal Engineer units, as well as supporting elements such as Royal Army Service Corps and Royal Army Medical Corps units.[3] Most of the division had seen action in North Africa and Sicily,[4] particularly the1st Parachute Brigade and 1st Airlanding Brigade.[4] However, this was the first time the division had fought together as a complete unit.[5] The division was also substantially reinforced by the addition of 1,200 men of the Glider Pilot Regiment, providing Urquhart with the equivalent of two battalions of infantry for the operation.[6] Smaller additions included a Dutch commando team and American communications teams.[7] Urquhart also had the 1st Independent Polish Brigade under his command, who would also be joining the British in the operation to seize the bridges.[8] The Division was required to secure the road, rail and pontoon bridges over the Lower Rhine at Arnhem and hold them for two to three days until relieved by XXX Corps.[9] From the beginning, however, Urquhart was severely restricted in how he could prepare and deploy his troops for the upcoming battle. The U.S. IX Troop Carrier Command were limited in their availability; with two more major drops taking place at the same time, there were insufficient carrier aircraft available to fly the entire division to the Netherlands in one lift. Additionally, Major General Williams—commander of IX Troop Carrier Command—decided that it would only be possible for one air lift per day,[10]meaning it would take three days to deliver the entire Division and Polish Brigade to the area. A limited number of areas suitable for glider landings and a reluctance from troop command to fly too near to Arnhem, exposing them to flak from Deelen airfield after the drop,[11] meant that Urquhart was forced to pick drop zones (DZ) and landing zones(LZ) up to 8 mi (13 km) from Arnhem itself, on the north side of the river.[12] With the need to secure the bridges, towns and drop zones for subsequent supply drops, the 1st Airborne would need to defend a perimeter of some 18 mi (29 km) whilst waiting for XXX Corps.  Major General Roy Urquhart shortly after returning to his Divisional HQ at theHotel Hartenstein, 19 September. Major General Roy Urquhart shortly after returning to his Divisional HQ at theHotel Hartenstein, 19 September.
Urquhart decided to land Brigadier Gerald Lathbury's 1st Parachute Brigade and Brigadier "Pip" Hicks' 1st Airlanding Brigade on the first day of the operation.[12] The Airlanding Brigade plus 1st Airlanding Light Regiment Royal Artillery, Royal Engineer and medical units and Divisional HQ would land on LZs 'S' and 'Z' and move to secure the drop zones and landing zones for the following days drops, whilst the three battalions of the parachute brigade would arrive at DZ 'X' and follow three separate routes into Arnhem to secure the bridges.[13] The 2nd Battalion—under the command of Lt. Col. John Frost—would follow the riverside roads to the centre of Arnhem (codenamed the Lion route) and secure the main road and railway bridges, as well as a pontoon bridge between the two. The 3rd Battalion of Lt. Col. Fitch would head through Oosterbeek to Arnhem (Tiger route), assist in the capture of the road bridge and take up positions in the east of the town.[13] Lt. Col. Dobie's 1st Battalion would follow Leopard route north of the railway line to occupy high ground north and north west of Arnhem.[13] The whole advance would be led by a troop of Reconnaissance jeeps from the 1st Airborne Reconnaissance Squadron, under Major Frederick Gough on Leopard who would attempt a coup de main on the road bridge.[14] On the second day, Brigadier "Shan" Hackett's 4th Parachute Brigade would arrive at DZ 'Y', accompanied by extra artillery units and remaining elements of the Airlanding Brigade on LZ 'X'. Hackett's three battalions would then reinforce the positions north and north west of Arnhem.[12] On the third day, the Polish Parachute Brigade would be dropped south of the river at DZ 'K'.[12] Using the road bridge, they would reinforce the perimeter east of Arnhem, linking up with their own artillery who would be flown in by glider to LZ 'L'. 1st Airlanding Brigade would fall back to cover Oosterbeek on the western side of the perimeter and 1st Parachute Brigade would fall back to cover the southern side of the bridges.[12] Once XXX Corps had arrived and advanced beyond the bridgehead, the 52nd (Lowland) Infantry Division would be flown into Deelen airfield to support the ground forces north of the Rhine.[15] The remaining units of the division would follow XXX Corps on land in what was known as the sea tail.[12] The whole operation would be re-supplied by daily flights by No's. 38 and 46 Group RAF[16] who would make the first drop on LZ 'L' on day 2, and subsequent drops on DZ 'V'.[17] Intelligence [edit] Due to poor intelligence, the British were told to expect only limited resistance from German reserve forces. A serious challenge to their operation was not expected and many men believed that their work would lead to the ending of the war.[18] Some—anticipating a period of occupation in Germany—packed leisure equipment in their kit or in the sea tail.[19] The optimistic mood prior to the operation would have tragic consequences however. Browning's intelligence officer—Major Brian Urquhart—obtained information from the 21st Army Group in Belgium and Dutch resistance that German armour was present around Arnhem. This was backed up with aerial reconnaissance that he ordered to be flown.[20] Browning however was dismissive and ordered his chief medical officer to have Urquhart sent on sick leave.[21] In fact,SHAEF was aware that there were almost certainly two Panzer divisions at Arnhem but with the operation looming chose to ignore them.[20] Such information would have been gleaned from Ultra intercepts that the Allied Airborne Army was not privy to and therefore could not act upon themselves 
German Self-propelled anti-aircraft guns of the 9th SS Panzer Division during the battle. The presence of the II SS Panzer Corps would have a significant effect on the battle. The Allied liberation of Antwerp on 4 September had caused a rout of German reserve troops in the Netherlands, nicknamed "Mad Tuesday".[22] However the Allied pause at the Dutch border gave the Germans time to regroup and reorganise,[23] although it would make subsequent attempts to clarify the exact German forces opposing the Allies extremely difficult.[22] Feldmarschall Walter Model—commander of Army Group B—had moved his headquarters to Arnhem and was re-establishing defences in the area and co-ordinating the reorganisation of the scattered units[24] so that by the time the Allies launched Market Garden there would be several units opposing them. To the west of Arnhem was Kampfgruppe Von Tettau, a force equivalent to seven battalions made up of all manner of German units (including Wehrmacht, Luftwaffe, Kriegsmarine, rear echelon and Waffen-SS troops) under the command of General Hans von Tettau at Grebbeberg.[25] This included the SS Non-commissioned officer school SS Unteroffizierschule Arnheim and the 16th SS Training Battalion under the command of SS Sturmbannführer Sepp Krafft whose unit would play a crucial role in the opening phases of the battle. Within Arnhem itself, the town garrison was under the command of Major-General Friedrich Kussin 
Walter Model and Heinz Harmel. Additionally, Obergruppenführer Wilhelm Bittrich's II SS Panzer Corps—comprising the remains of Walter Harzer’s 9th SS andHeinz Harmel’s 10th SS Panzer Divisions—had moved into the area north of Arnhem to refit and reorganise.[27] Although badly mauled after escaping the Falaise Pocket, the Korps was made up of seasoned veterans and made available significantly more forces to the Germans than the allies had been led to expect.[28] The divisions were also specially trained in anti-airborne operations; during their formation both divisions had undergone month-long anti airborne exercises whilst waiting for their heavy equipment, and had also spent the last 15 months studying the best reactions to a parachute attack in classroom and field exercises.[29] The 9th SS had a Panzergrenadier brigade, a reconnaissance battalion, an artillery battalion, two batteries of self-propelled guns and a company of tanks.[30] Exactly how many men were available after the withdrawal from Normandy is unclear. Some sources suggest that the 9th had up to 6,000 men,[31] others suggest that the combined total of the 9th and 10th SS was only 6,000–7,000 men.[27][30] There were also Dutch units allied to the Germans present at Arnhem. These formations recruited from Dutch nationals (mainly criminals, men wishing to avoid national service or men affiliated with the Nationaal-Socialistische Beweging) and were incorporated into the German Army.[32] At Arnhem, the partly Dutch SS Wachbattalion 3 was attached to Kampfgruppe Von Tettau[33] and the 3rd Battalion of the 34th SS Volunteer Grenadier Division Landstorm Nederland training at nearby Hoogeveen was quickly attached to Harzer’s 9th SS Panzer Division when they arrived at the battle on 20 September. As the battle progressed, more and more forces would become available to the Germans. Adolf Hitler—stunned by the attack—agreed that the defence of the Netherlands should receive absolute priority and over the course of the battle reinforcements would stream in; from Wehrkreis VI, the Wesel area and General Friedrich Christiansen's Armed Forces Command Netherlands.[35] Model arranged for units to be sent straight to the units in action in order to avoid long winded logistics, and rushed in specialist street fighting and machine gun battalions. Each day of the battle, the German military strength increased whilst the British supplies diminished. By 21 September, the fifth day of the battle, German forces outnumbered the British by 3:1 and continued to increase. 
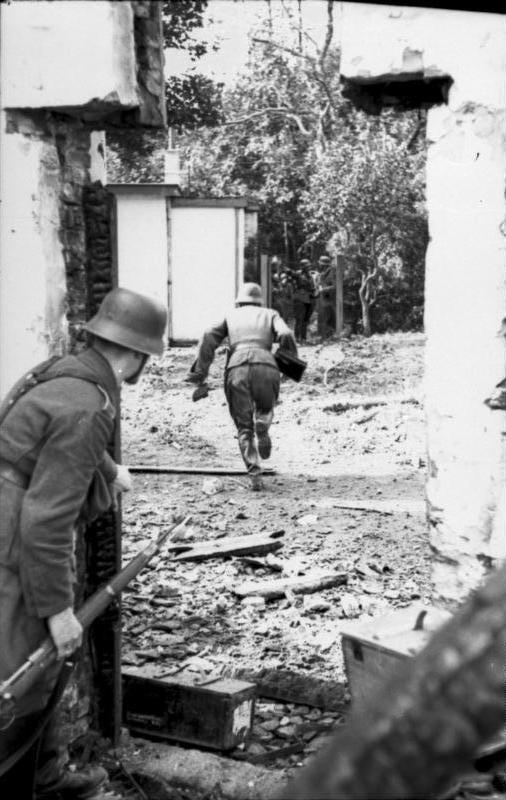
First infantry movements, 17 September. The first lift was preceded by intense bombing and strafing raids made by the British 2nd Tactical Air Force and the American 8th and 9th Air Forces. These targeted the known flak guns and German garrisons and barracks across the area. Meanwhile, the first lift suffered only light losses as the aircraft and gliders flew from British bases to the target area. The first arrivals were the 21st Independent Parachute Company at 12:40, who marked the landing zones for the gliders and parachutists in advance of the main landings.The landings were largely unopposed and the battalions formed up in good order ready to carry out their tasks by 14:45. While the Airlanding Brigade moved into defensive positions around the landing zones, the 1st Parachute Brigade prepared to head east toward the bridges, with Lathbury and his HQ Company following Frost on Lion route. Although some jeeps of the reconnaissance squadron were lost on the flight over, the company formed up in good strength and moved off along Leopard route. The Germans were unprepared for the landings and initially thrown into confusion. Model—erroneously assuming that the paratroopers had come to capture him—fled his headquarters at the Hartenstein hotel in Oosterbeek and went to Bittrich's headquarters east of Arnhem at Doetinchem where he took personal control of the battle.The 10th SS Division was sent south to respond to the American landings at Nijmegen and defend the "island" (the polder between the Lower Rhine and Waalrivers), while the 9th would defend Arnhem. The 9th SS was at that point making preparations to return to Germany and Harmel was in Berlin trying to secure more men and supplies for his unit. He was instantly ordered to return to Arnhem whilst his division began to prepare its forces for battle. Obersturmbannführer Ludwig Spindler—commander of the 9th SS Armoured Artillery Regiment—quickly organised a small battlegroup (Kampfgruppe Spindler was initially only 120 men but would incorporate 16 separate units over the course of the battle). In the late afternoon, he was ordered to advance west to Oosterbeek and establish a blocking line to prevent the British from reaching Arnhem centre.[41] Meanwhile, the Division's Reconnaissance Battalion under the command of Hauptsturmführer Viktor Gräbner was ordered south to Nijmegen, crossing the Arnhem bridge at dusk. Initially, however, no units were ordered to secure the bridge itself. Arnhem Garrison commander Major-General Kussin was killed by men of the 3rd Parachute Battalion as he sped towards his headquarters, and his death led to a breakdown in command and responsibilities. It was not until late in the afternoon that the Reconnaissance Battalion of 10th SS Division were ordered to secure the bridge. At the time of the landings, only one organised unit was in place to oppose the allied advance toward the bridges (the 16 SS Training Battalion camped in Wolfheze) and their commander—Sepp Krafft—acted quickly to establish a blocking screen west of Oosterbeek. 
Horsa and Hamilcar gliders of the 1st Airlanding Brigade litter landing zone 'Z' west of Wolfheze, 17 September. North is at the photo's bottom. The Allied advance quickly ran into trouble. The reconnaissance squadron was ambushed by the northern flank of Krafft's blocking line and withdrew. The 1st and 3rd Parachute Battalions were also stalled by Krafft's defences and spent the rest of the day skirting his line. The 3rd Parachute Battalion went south and halted in Oosterbeek for most of the night while 1st Parachute Battalion went further north but hit Spindler's forces and was unable to reach the Arnhem-Ede road of Leopardroute. Instead Dobie decided to abandon his plan and help Frost at the bridge and the battalion headed south into Oosterbeek overnight. Only the 2nd Parachute Battalion was largely unopposed, bypassing the defences that did not as yet reach down as far as the river. They were slowed by cheering Dutch civilians and did not reach the bridges until late in the day. The railway bridge was blown by German engineers as the Allies approached it and the pontoon bridge was missing its central section. At dusk, the men of A Company under Major Digby Tatham-Warter observed Graebner's force cross the bridge. Most of the battalion and various other supporting units—including two jeeps of Goughs squadron, four 6-pounder anti-tank guns, Brigade HQ (but without Lathbury), and Royal Engineers (in total numbering about 740 men)— moved into Arnhem centre as night fell and owing to the oversight in German orders were able to secure the undefended northern end of the road bridge. Lieutenant Jack Grayburn led an attempt to secure the southern end of the bridge but was unsuccessful, and a later attempt using a flame thrower only succeeded in setting the freshly painted girders of the bridge alight. However, the British were able to make good their position and quickly repulsed the 10th SS Reconnaissance Battalion and other German units when they arrived to secure the bridge. Meanwhile, the Airlanding Brigade moved quickly to secure the landing zones. The 2nd Battalion, South Staffordshire Regiment moved into Wolfheze, the 1st Battalion,The Border Regiment secured DZ 'X', deploying its companies around the DZ and in Renkum, and the 7th Battalion King's Own Scottish Borderers moved to secure DZ 'Y'. Here, they ambushed the Dutch SS Wach Battalion as it headed toward Arnhem from Ede.Units of the Airlanding Artillery and Divisional HQ headed into Wolfheze and Oosterbeek where medical officers set up a Regimental Aid Post at the home of Kate ter Horst. The Allied advance was severely hampered by poor communications in these crucial initial phases. The paratroopers' radio sets range was instantly limited by the wooded terrain and as the battalions advanced they lost contact with Divisional HQ at the landing zones.Over the coming nine days, radio communication within the division, with Browning's HQ at Nijmegen, with XXX Corps and with the United Kingdom would be intermittent and unreliable, severely hampering the British units.Carrier pigeons were even used to make contact with England. Partly as a consequence of this limitation, Urquhart decided to follow the 1st Parachute Brigade and make contact with Lathbury. He found the Brigade HQ on Lion route but was informed Lathbury himself was visiting the 3rd Battalion. Urquhart followed him there but subsequently would not be able to return to Divisional HQ for two days. Day 2 – Monday 18 September  The 2nd lift advances into Arnhem where it encounters the German blocking line, 18 September. The 2nd lift advances into Arnhem where it encounters the German blocking line, 18 September.
As the second day dawned, the 9th SS Panzer Division continued to reinforce the German blocking line. Krafft's unit withdrew overnight and joined Spindler's line, coming under his command. Spindler's force was now becoming so large as more men and units arrived at the new front, that he was forced to split it into two battle groups: Kampfgruppes Allworden and Harder. The defensive line now blocked the entire western side of Arnhem and had closed the gap exploited by Frost alongside the river the previous evening. Overnight, the British 1st and 3rd Parachute Battalions had skirted as far south as 2nd Parachute Battalion's original route into the city, hoping to follow them into Arnhem centre. They approached the German line before light and for several hours attempted to fight through the German positions. Spindler's force—being continually reinforced—was too strong to penetrate, and by 10:00 the British advance was stopped. A more coordinated attack followed in the afternoon, but it too was repulsed. Urquhart attempted to return to his Divisional Headquarters at Oosterbeek but became cut off and was forced to take shelter in a Dutch family's loft with two fellow officers. Lathbury was injured and also forced into hiding. At the road bridge, German forces of the 9th SS had quickly surrounded Frost's battalion, cutting them off from the rest of the division. At around 09:00, the 9th SS Reconnaissance Battalion headed back toward Arnhem from south of the river, having concluded that it was not needed at Nijmegen. Though aware of the British troops at the bridge, it attempted to cross by force. In the resultant two-hour battle, it was beaten back with heavy losses, including its commanding officer Viktor Gräbner.German attacks carried on around the British perimeter for the rest of the day but the British continued to hold. 
Men of the 2nd Battalion, South Staffordshire Regiment advance toward Arnhem, towing a 6-pounder anti-tank gun with them, 18 September. At the landing zones, Brigadier Hicks was informed that in Urquhart's and Lathbury's absence, he was acting divisional commander. He was also told to send one of his units—the South Staffordshire Battalion (which was not complete and was awaiting its full complement of men in the second lift)—to Arnhem to help with the advance to the bridge. The South Staffords departed in the morning and linked up with the 1st Parachute Battalion in the late afternoon. German forces began to probe the 1st Airlanding Brigade defences throughout the morning. Units of Kampfgruppe Von Tettau attacked the Border's positions; men of the SS NCO school overran Renkum and Kriegsmarine troops engaged the British all day as they withdrew. Small amounts of fighting broke out around LZ 'X' but not enough to seriously hamper the glider landing there. At DZ 'Y', the Dutch SS Wach Battalion became heavily engaged with the King's Own Scottish Borderers, threatening to hamper the arrival of the second lift. The communications breakdown meant that it was impossible to warn the aircraft. Equally, there was no way for the division to know that the 2nd lift had been delayed by ground fog in England. Thus, the arrival of the 4th Parachute Brigade under Brigadier Hackett and several more troops of artillery at the drop zones was several hours overdue. When the parachutists did arrive after 15:00, they dropped under fire. Several were killed as aircraft and parachutists were shot down and the heath-land they were landing on caught fire. Nevertheless, the arrival of a full brigade overwhelmed the Dutch who were routed and surrendered in droves. Despite the setbacks, the units assembled with only slight casualties but the changing circumstances at Arnhem meant that their roles were quickly changed. The 11th Parachute Battalion and the rest of the South Staffords were immediately despatched to Arnhem to assist in the attempt to break through to the bridge, where they linked up with the 1st and 3rd Parachute Battalions after dark. Hicks' decision to send the 11th Parachute Battalion to Arnhem (thus weakening the 4th Parachute Brigade) dismayed Hackett, who remonstrated with Hicks to no avail. However, he was given command of The King's Own Scottish Borderers who were moving toward LZ 'L' to secure it for Tuesday's landing. The 10th and 156th Parachute Battalions moved north of the railway line to take up their planned defensive positions north west of Arnhem but the leading elements of 156th Parachute Battalion made contact with the main 9th SS blocking line after dark and withdrew for the night. Shortly after the second lift arrived, the first supply drop was made onto LZ 'L'. Although most supplies arrived, only a small amount could be collected as the area was not under full British control. The poor radio communication meant that it was not possible to alert the RAF and unsecured drop zones would be a major problem in the days to come. Day 3 – Tuesday 19 September 
British prisoners-of-war. The Germans took scores of prisoners after the morning's fighting on the 19 September. With the arrival of the South Staffords and 11th Parachute battalion at the 1st and 3rd Parachute Battalion's positions west of Arnhem, the British hoped to have sufficient troops to break through to Frost's position at the bridge. Lieutenant Colonel Dobie of 1st Parachute Battalion planned to attack before first light but an erroneous report suggesting that the bridge had fallen led to the attack being cancelled. By the time the report was corrected, first light was not long away but with reinforcement at the bridge the priority, the attack had to proceed. The advance began on a narrow front with the 1st Parachute Battalion leading, supported by remnants of the 3rd Parachute Battalion, with the 2nd South Staffordshires on the left flank and the 11th Parachute Battalion following behind. As soon as it became light, the 1st Parachute Battalion was spotted and halted by fire from the main German defensive line. Trapped in open ground and under heavy fire from three sides, the 1st Parachute Battalion disintegrated and what remained of the 3rd Parachute Battalion fell back. The 2nd South Staffordshires were similarly cut off and save for about 150 men, overcome by midday. The 11th Parachute Battalion—which had thus far not been heavily involved—was now overwhelmed in exposed positions while attempting to capture high ground to the north. The South Staffords similarly attempted to secure high ground but were driven off. With no hope of breaking through, the 500 remaining men of these four battalions retreated westwards in the direction of the main force, 5 km (3.1 mi) away in Oosterbeek. As they approached Oosterbeek they were met by Lieutenant Colonel Sheriff Thompson, of the 1st Airlanding Light Artillery Regiment, who formed most of the men into a defensive screen under Major Robert Cain .5 mi (0.80 km) forward of his artillery positions. The battle gave Urquhart the opportunity to escape his position and he was able to return to Division HQ at the Hotel Hartenstein in Oosterbeek, where for the first time he was able to learn the extent of the German forces facing them. In Britain, ground fog again frustrated reinforcement. Thirty-five gliders of the 3rd lift carrying the Polish glider borne elements were delayed in taking off and the whole parachute brigade failed to take off at all. This would have serious consequences on the ground when the delayed gliders arrived. 
A German 20 mm FlaK gun awaits the arrival of supply aircraft during the battle. North of the railway line, the 156th and 10th Parachute Battalions became engaged with the German defensive line as they attempted to seize the high ground in the woods north of Oosterbeek. Both battalions' advances were blunted against the well-defended German positions and by early afternoon they had not advanced any further than their original positions. Urquhart—realising the need to assume a more defensive stance and prevent the two battalions being cut off north of the railway—ordered them to fall back to Wolfheze and Oosterbeek. Making a fighting withdrawal with the Germans of Kampfgruppe Krafft closely pursuing them, the units fell back across LZ 'L', defended by the King's Own Scottish Borderers who were awaiting the arrival of the Glider borne elements of the Polish Parachute Brigade. Heavy fighting ensued as the gliders arrived in the middle of the retreat and Polish losses were heavy. All four Allied units streamed south and west toward the road crossings over the steep railway cutting at Oosterbeek and Wolfheze and gathered in ad hoc units in the woods on the south side, where most of them spent the night. Some German units followed them across the railway and an SS battalion reached Wolfheze where it was strafed by its own air force. In the afternoon, the RAF flew its first major resupply mission, using 164 aircraft to fly in 390 short tons (350 t) of supplies to the British. The Germans—who had been expecting resupply efforts—had moved five flak batteries into the area specifically to attack these flights and as the RAF came into view they succeeded in shooting down 10 aircraft. Despite the bravery of the pilots (Flight Lieutenant David Lord received the Victoria Cross posthumously), the Airborne forces only recovered 31 short tons (28 t) of supplies. The dropzone—Supply DZ 'V'—was still in German hands (the British would never reach this SDZ during the battle) and no message had reached Britain to explain this. At the bridge, Frost's forces continued to hold but without supply or reinforcement their position was becoming weaker. The Germans—realising that infantry attacks were unlikely to remove the stubborn defenders—began to systematically destroy the houses the British were in using tanks, artillery and mortars. In the absence of any Allied air cover, the Luftwaffe were able to make strafing runs on the British occupied houses as well. Day 4 – Wednesday 20 September 
The British battalions break off their engagements and withdraw into the Oosterbeek perimeter, 19–21 September. By now, the division was too weak to attempt to reach Frost at the bridge. Of the nine infantry battalions, only one (1st Battalion, The Border Regiment) still existed as a unit, the rest were badly mauled or scattered.[104] Urquhart made the difficult decision to form a defensive perimeter around Oosterbeek, abandoning the 2nd Parachute Battalion.[105] By securing the Driel Ferry Crossing, Urquhart hoped to hold out until XXX Corps could reach them and establish a new bridgehead over the Rhine using the ferry crossing platforms.[105] The eastern side of Osterbeek was fairly stabilised after the retreat of the previous day, with numerous ad hoc units under company commanders defending the approaches to the town. Major Richard Lonsdale had taken command of the outlying units that had retreated from Arnhem the previous day, and their positions weathered heavy German attacks before falling back to the main divisional perimeter at Oosterbeek.[106] This sector was later designated Lonsdale Force and would remain the main line of defence on the south eastern perimeter.[107] The Border Regiment held most of the western edge of the town, with scattered units filling the gaps to the north. As more units fell back to the new defensive area, they were re-organised to establish a thumb shaped perimeter using the Rhine as its southern base.[108] The mixed units at Wolfheze began to fall back in the morning but several were surrounded and captured, including one party of 130 men.[109] 150 men of 156th Parachute battalion—led by Hackett himself—became pinned down and took cover in a hollow some 400 m (440 yd) west of the Oosterbeek perimeter.[110] The men broke out in the late afternoon, with 90 men making it to the Border Regiment's positions. 
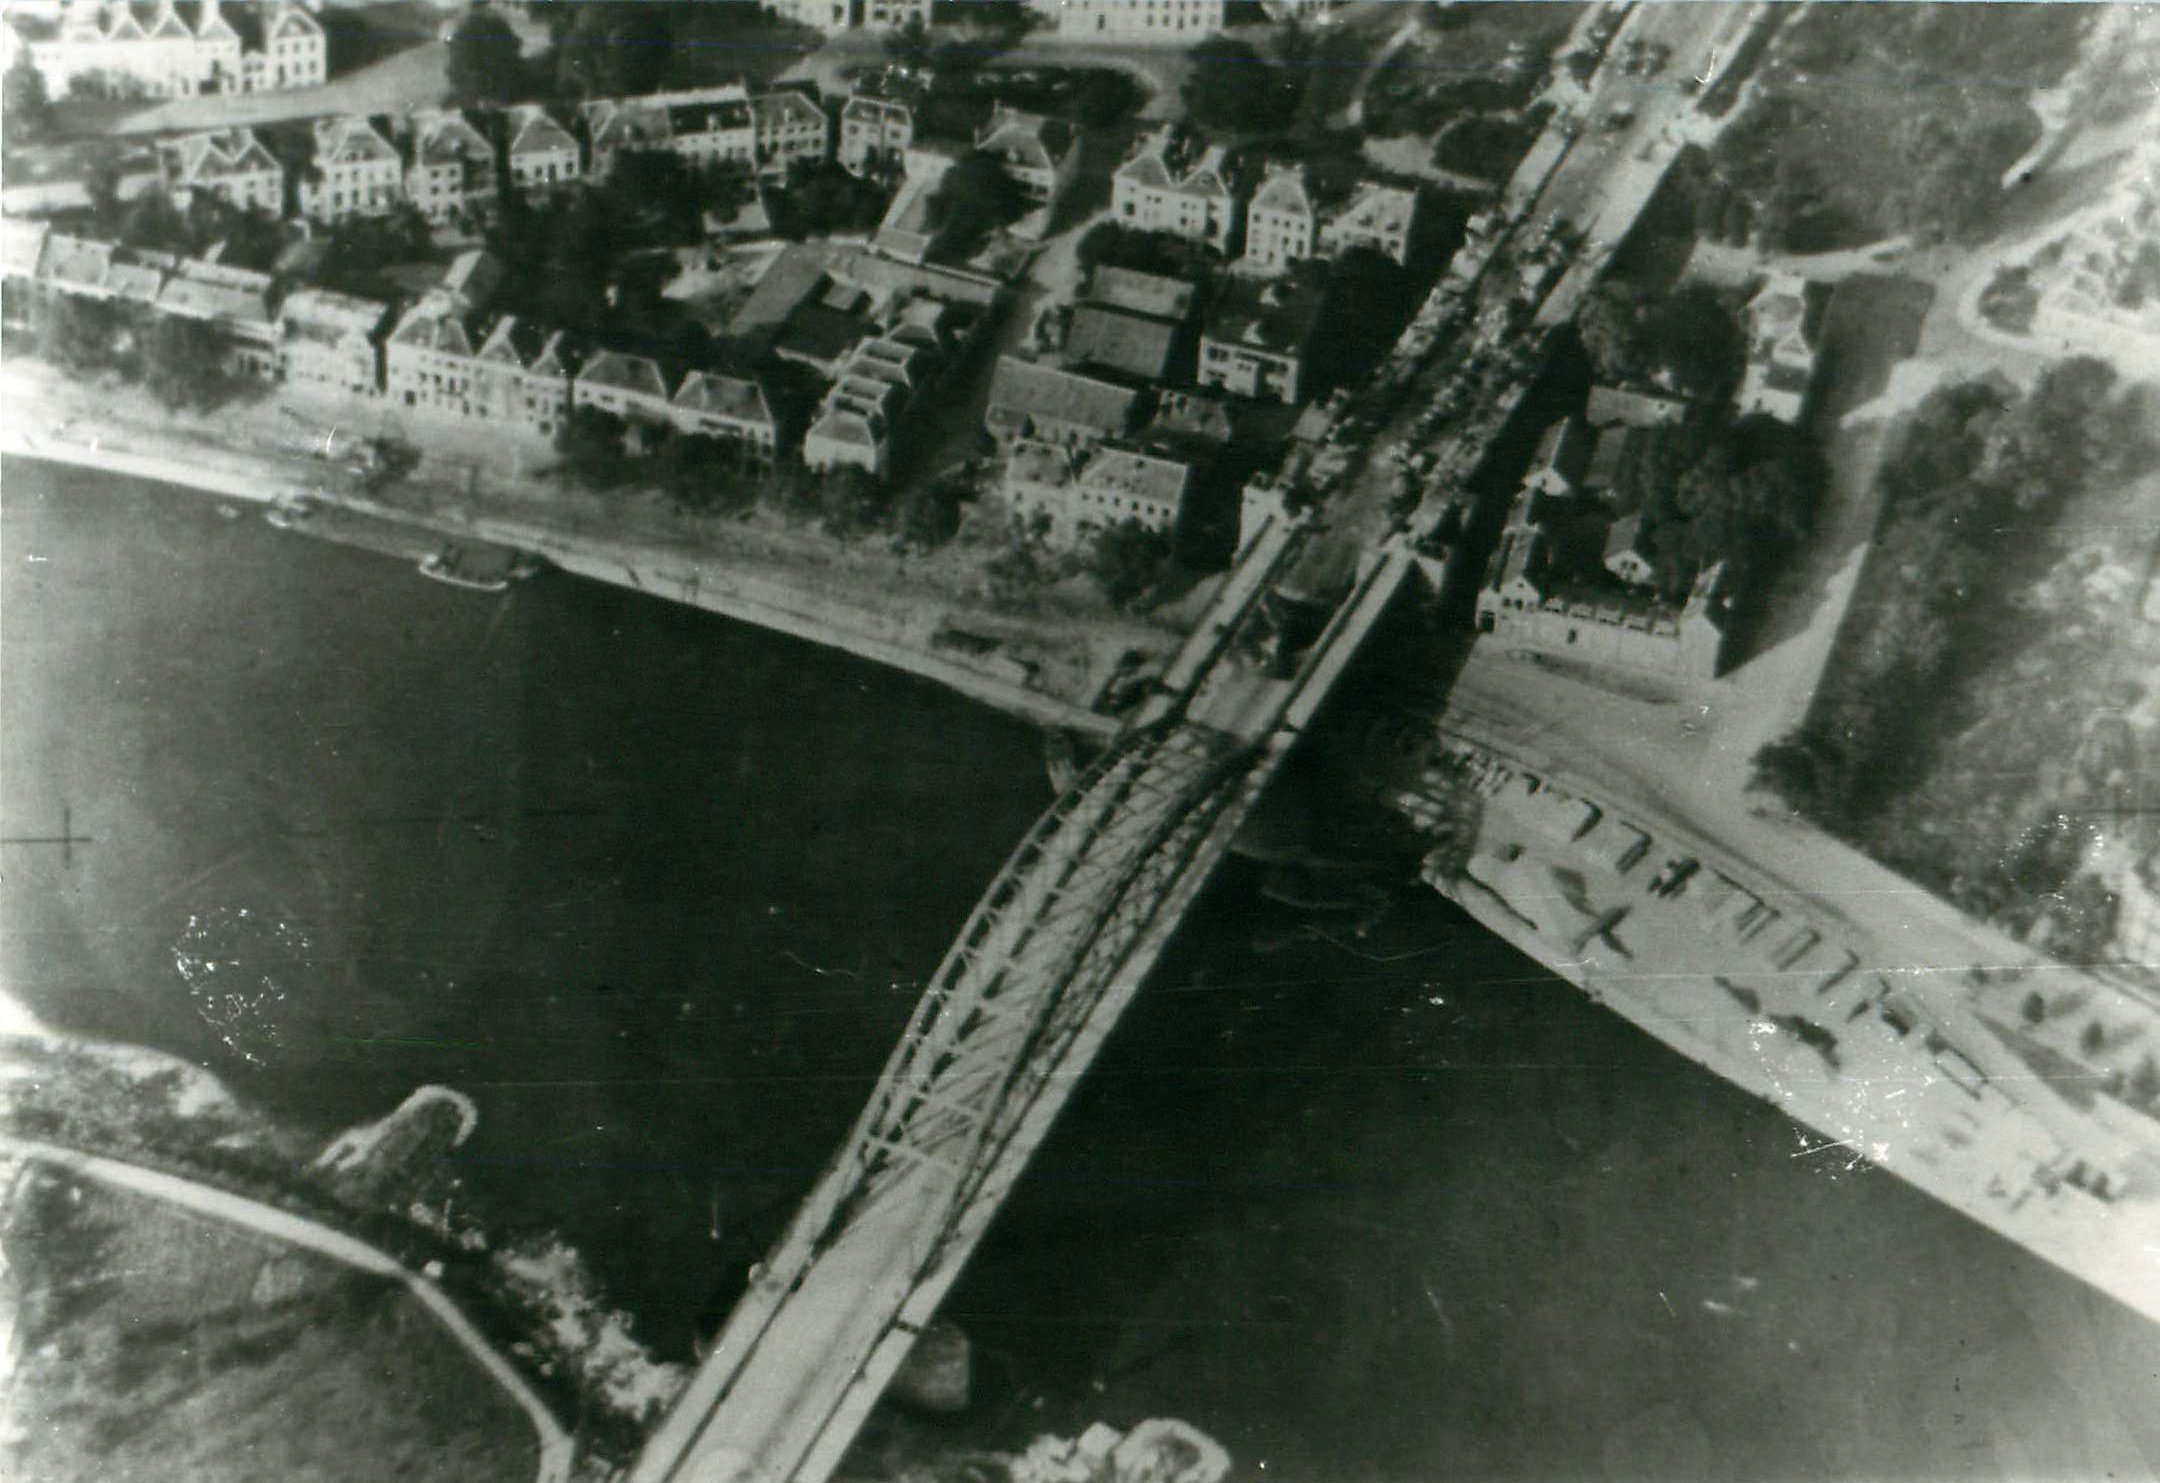
Men of the Glider Pilot Regimentsearch for snipers, 20 September. The afternoon's supply drop was little better than the previous day's. Although a message had reached Britain to arrange a new dropping zone near the Hotel Hartenstein, some aircraft flew to LZ 'Z' where all their supplies fell into German hands. At Oosterbeek, the Germans had used British marker panels and flares to attract the aircraft to their positions and the aircraft were unable to distinguish the exact dropping zones. Ten of the 164 aircraft involved were shot down around Arnhem for only 13% of supplies reaching British hands. At the bridge, Frost was finally able to make radio contact with his divisional commander and given the difficult news that reinforcement was doubtful. Shortly afterwards at about 13:30, Frost was injured in the legs by a mortar bomb. Command passed to Major Gough but by late afternoon the position was becoming untenable. As fire took hold of many of the buildings in which the wounded were being treated, a two-hour truce was organised in the late afternoon. The wounded (including Frost) were taken into captivity. Overnight, a few units managed to hold out for a little longer and several groups tried to break out toward the Oosterbeek perimeter but by 05:00 on Thursday morning all resistance at the bridge had ceased. In the final hours of the struggle, a radio message was sent from the bridge. It was not picked up by the British but was heard by the German forces, who recalled that it ended with the sentences: "Out of ammunition. God Save the King." Day 5 – Thursday 21 September 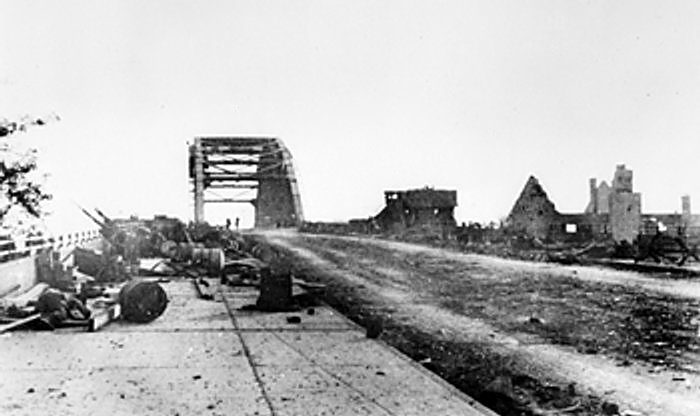 The Arnhem Bridge after Frost's force had been overrun and the road cleared. Notice the destroyed buildings on the right. Throughout the morning, the Germans mopped up British survivors and stragglers in hiding around Arnhem bridge. It took several hours to clear the bridge of debris allowing German armour to cross and reinforce Nijmegen. Crucially, the British had held the bridge long enough to allow Nijmegen bridge to be captured by the 82nd Airborne and Guards' Armoured Division working together.[120] With the resistance at the bridge crushed, the Germans had more troops available to commit to the Oosterbeek engagement, although this changed suddenly in the afternoon. Two days late, the parachute infantry battalions of Stanisław Sosabowski's 1st (Polish) Parachute Brigade were able to take off in England. 114 C-47s took off but 41 aircraft turned back after Troop Carrier Command decided it would be too dangerous to land if the aircraft were up too long. The remainder pressed on; they did not have the correct transmission codes and did not understand the messages. One of the few messages to get out of Arnhem warned the Poles that DZ 'K' was not secure and to land instead on the polder east of Driel where they should secure the Heveadorp ferry on the south bank of the Rhine. The Poles dropped under fire at 17:00 and sustained casualties but assembled in good order. Advancing to the river bank, they discovered that the ferry was gone; the ferryman had sunk it to deny its use to the Germans. The arrival of the Poles relieved the pressure on the British as the Germans were forced to send more forces south of the Rhine. Fearing an attack on the southern end of the road bridge or the Nijmegen road, a battalion of the 34th SS Volunteer Grenadier Division Landstorm Nederland, Machine Gun Battalion 47 and other Kampfgruppes headed across the river overnight.  British prisoners at Arnhem Bridge. They are unshaven after four days of fighting – water was scarce during the battle. British prisoners at Arnhem Bridge. They are unshaven after four days of fighting – water was scarce during the battle.
At Oosterbeek, the defensive positions were consolidated and organised into two zones. Hicks would command the western and northern sides of the perimeter and Hackett, after some rest, the eastern front. The perimeter was not a complete defensive line but a collection of defensive pockets in houses and foxholes surrounding the centre of Oosterbeek, with the divisional Headquarters at the Hotel Hartenstein at its centre. The perimeter was roughly 3 mi (4.8 km) around and was defended by approximately 3,600 men. Despite the Germans' best efforts, the line would remain roughly unchanged for the next five days,although Germans of the Hermann Göring NCO School attacked the Border positions on the west side near the Rhine, forcing them to abandon strategically important high ground overlooking Oosterbeek. The biggest boost to the besieged British was being able to make contact with forward artillery units of XXX Corps. Radio contact was made with 64th Medium Regiment, Royal Artillery who were able to drop heavy and accurate shellfire on German positions around the perimeter. The radio link to the battery's Headquarters was also used as the main line of communication to XXX Corps. So important was the shellfire provided by 64 Medium Regiment that afterward Urquhart lobbied (unsuccessfully) for the Regiment to be able to wear the airborne Pegasus badge on their uniforms. The British had witnessed the Polish drop but were unable to make contact by radio so a swimmer was sent south of the Rhine. The British planned to supply rafts for a river crossing that night as the Poles were desperately needed on the northern bank. The Poles waited on the southern bank, but by 03:00 no rafts were evident and they withdrew to Driel to take up defensive positions. Day 6 – Friday 22 September 
German forces in Oosterbeek. There was bitter house to house fighting around the perimeter. Overnight, the Germans south of the river formed a blocking line along the railway, linking up with 10th SS to the south and screening the road bridge from the Poles.The Polish were well dug in at Driel, however, and German armour was unable to manoeuvre off of the main roads to attack them. Hopes were raised when three armoured cars of XXX Corps' Household Cavalry managed to skirt the German defences on the island and link up with Sosabowski's force. These were followed after dark by tanks of the 4th/7th Royal Dragoon Guards and infantry of the 5th Battalion Duke of Cornwall's Light Infantry. Behind them, the rest of the 43rd Wessex Division was making its way up a narrow corridor. In Oosterbeek, heavy fighting continued around the perimeter. Intense shelling and snipers increased the number of casualties and the aid posts in the hotels and houses of the town. Bittricht ordered that the attacks were stepped up and the British bridgehead north of the Rhine destroyed and at 09:00 the major attacks began with the various Kampfgruppes of 9th SS attacking from the east and Kampfgruppe von Tettau's units from the west. There were only small gains but were followed by simultaneous attacks in the afternoon when the Germans made a determined moves on the northern and eastern ends. To the north, they succeeded in briefly forcing back the King's Own Scottish Borderers before they counterattacked and retook their positions. Urquhart realised the futility of holding the tactically unimportant tip however and ordered the units in the north to fall back and defend a shorter line. To the east, the remains of 10th Parachute Battalion were nearly annihilated in their small position on the main Arnhem road, but the Germans failed to gain any significant ground. Two of Urquhart's staff officers swam the Rhine during the day and made contact with Sosabowski's HQ. It was arranged that six rubber boats should be supplied on the northern bank to enable the Poles to cross the river and come into the Oosterbeek perimeter. That night, the plan was put into operation, but the cable designed to run the boats across broke and the small oars weren't enough to paddle across the fast flowing river. Only 55 Poles made it over before light and only 35 of these made it into the perimeter Day 7 – Saturday 23 September 
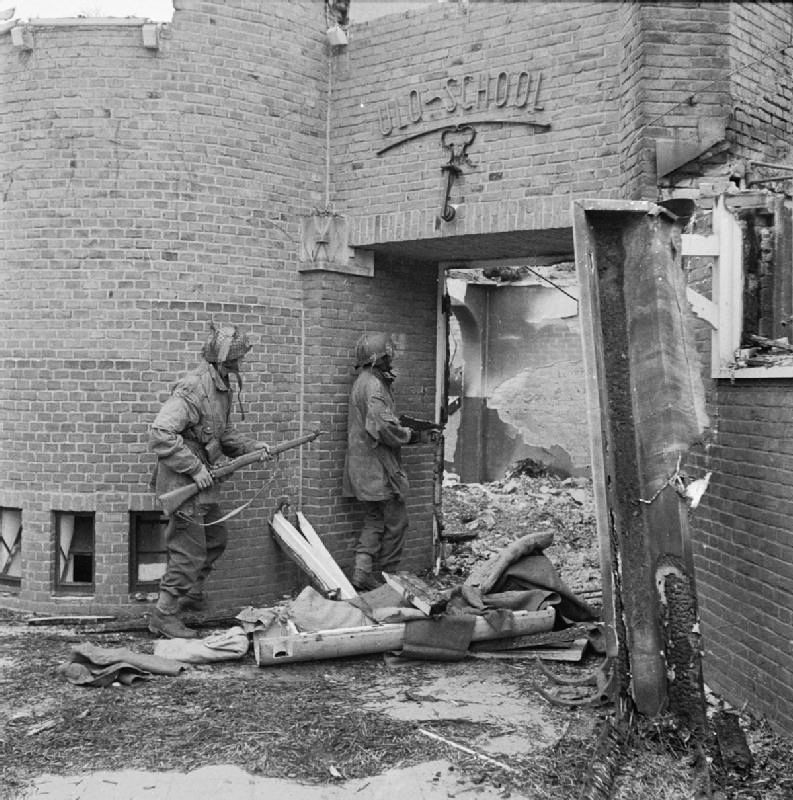
British forces move through a ruined building in Oosterbeek. Spindler was ordered to switch his attacks further south and try to force the British away from the river, thus isolating the British from any hope of reinforcement and allowing them to be destroyed. Despite their best efforts, they were unsuccessful, but the constant artillery and assaults continued to wear the British defences down further. A break in the weather allowed the RAF to finally fly combat missions against the German forces surrounding Urquharts men. Hawker Typhoons and Republic P-47 Thunderbolts strafed German positions throughout the day and occasionally diced with the Luftwaffe over the battlefield. The RAF attempted their final resupply flight from Britain on the Saturday afternoon, but lost eight planes for little gain to the Airborne troops. Some small resupply efforts would be made from Allied airfields in Europe over the next two days but to little effect. South of the river, the Poles prepared for another crossing. That night, they awaited the arrival of assault boats from XXX Corps, but these did not arrive until after midnight, and many were without oars. The crossings started at 03:00, with fire support from the 43rd Wessex Division. Through the remaining hours of darkness, only 153 men were able to cross – less than ¼ of the hoped for reinforcement. Day 8 – Sunday 24 September 
Two troopers dug in near Oosterbeek on 18 September, showing the woodland fought in on the western side of the British perimeter. In the morning, Horrocks visited the Polish positions at Driel to see the front for himself. Later, he hosted a conference attended by Browning, Major-General Ivor Thomas of the 43rd (Wessex) Division and Sosabowski at Valburg. In a controversial meeting in which Sosabowski was politically outmanoeuvred, it was decided that another crossing would be attempted that night. When the Germans cut the narrow supply road near Nijmegen later that day though, it seems Horrocks realised the futility of the situation and plans were drawn up to withdraw the 1st Division. In Oosterbeek, the situation was becoming more desperate. Hackett was wounded in the morning and had to give up the eastern command. The RAF attempted some close support around the perimeter which just held, but shelling and sniping increased casualties by the hour. The aid stations were home to some 2,000 men, both British and German as well as Dutch civilian casualties. Because many of them were actually in the front line in homes taken over earlier in the battle, the odd situation was created where casualties were evacuated forward rather than rearwards. Without evacuation, the wounded were often injured again and some posts changed hands between the British and Germans several times as the perimeter was fought over. 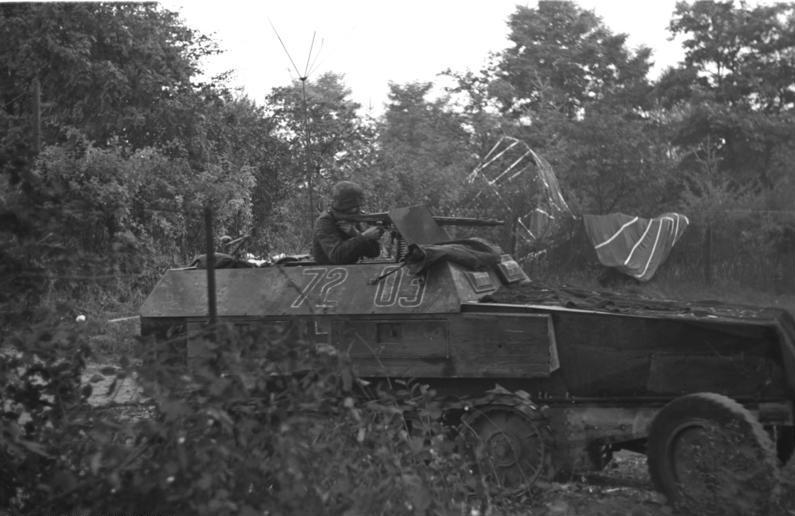
A 9th SS SdKfz 250 half-track in action at Oosterbeek. Notice the supply parachute in the background. Throughout the fighting around Oosterbeek, there had been short localised truces around the aid posts to allow the wounded to reach them, but by Sunday the situation needed a more serious arrangement. Colonel Graeme Warrack—the senior medical officer—asked permission to arrange a truce; it was a request that Urquhart agreed to. Warrack was taken to see Bittrich who similarly agreed and offered Warrack as many supplies as he could carry. Between 15:00 and 17:00, a general ceasefire went into effect around the perimeter and about 450 stretcher cases and walking wounded were evacuated from the perimeter,the Germans using jeeps and ambulances to take serious cases straight to Queen Elizabeth Hospital in Arnhem where British, German and Dutch medical staff worked side by side. That night, the Allies on the south side of the river attempted another crossing. The plan called for 4th Battalion The Dorset Regiment and the 1st Polish Parachute Battalion to cross at 22:00 using boats and DUKWs. Sosabowski was furious at having to give up control of one of his battalions and thought the plan dangerous, but was silenced. The boats failed to arrive until 1 am and several had been destroyed or lost en route, so a last minute change of plan mean that only the Dorsets would cross.The small boats without skilled crews, the strong current and poor choice of landing site on the north bank meant that of the 315 men who embarked, only a handful reached the British lines on the other side. The DUKWs and most boats landed too far downstream and at least 200 men were captured. Day 9 – Monday 25 September Operation Berlin (Arnhem rescue) 
A German Sturmhaubitze 42 at Arnhem. Overnight, a copy of the withdrawal plan was sent across the river for Urquhart's consideration. Despite the obviously frustrating content, Urquhart knew there was little other choice and radioed Thomas at 08:00 to agree to the plan on the condition it went ahead that night. Meanwhile, the Airborne forces would need to endure another day in their perimeter. More men were evacuated from the aid posts throughout the day, but there was no official truce and this was sometimes done under fire. At 10:00, the Germans began their most successful assault on the perimeter, attacking the southeastern end with infantry supported by newly arrived Tiger tanks. This assault pushed through the defenders' outer lines and threatened to isolate the bulk of the division from the river. Strong counterattacks from the mixed defenders and concentrated shellfire from south of the river eventually repelled the Germans. Urquhart formulated his withdrawal plan on the successful method used in the evacuation of Gallipoli during the First World War. The northernmost units would fall back first, moving through the more southerly groups who would then follow behind. The Glider Pilots would organise the routes to the river and the whole operation would be covered by an intense artillery barrage from XXX Corps. South of the river the evacuation was organised and staffed by men of the Royal Engineers of 43rd Division and Royal Canadian Engineers, using rafts and storm boats. In order to prevent the Germans from learning about the operation, the plan was not announced until the afternoon and some men (mainly wounded) would remain to lay covering fire through the night. Men were ordered to muffle their boots and weapons to help them bypass known German incursions into the perimeter. Some men took the opportunity to shave before withdrawing, providing quite a morale boost. By 21:00, heavy rain was falling which helped disguise the withdrawal. The heavy bombardment commenced and the units began to fall back to the river. Half of the engineers' boats were too far west to be used (43rd Division mistakenly believing the crossing points used by the Dorsets the previous night were in British hands), slowing the evacuation process. The Germans shelled the withdrawal, believing it to be a resupply attempt. At 05:00, the operation was ceased lest the coming light enable the Germans to fire onto the boats more accurately. 2,163 Airborne men, 160 Poles, 75 Dorsets and several dozen mixed other men were evacuated but about 300 were left on the northern bank when the operation was ceased and 95 men were killed overnight. Throughout the morning of 26 September, the Germans pressed home their attacks and finally linked up from both sides at the river. It was not until about noon that they realised the British had actually withdrawn. Later in the day, they rounded up about 600 men, mostly the men in the aid stations and those left on the north bank, as well as some pockets of resistance that had been out of radio contact with division Headquarters and did not know about the withdrawal. Aftermath 
The grave of an unknown British airborne soldier at Arnhem, photographed by a British Army sergeantafter the liberation of the city in 1945. Arnhem was a victory for the Germans (albeit tempered by their losses further south and a major defeat for the British army. The Allies withdrew from the southern bank of the Rhine and the front stabilised on "the island" between the Rhine and Waal rivers. Although the Germans counterattacked in October they were repulsed and subsequently the front line in the Netherlands would not move until after the winter. However, the bridgeheads across the Maas and Waal served as an important base for subsequent operations against the Germans on the Rhine and the strike into Germany. Many military commentators and historians believe that the failure to secure Arnhem was not the fault of the airborne forces (who had held out for far longer than planned), but of the operation as a whole. John Frost noted that "by far the worst mistake was the lack of priority given to the capture of Nijmegen Bridge" and was unable to understand why Browning had ordered U.S. Army Brigadier General James M. Gavin of the 82nd Airborne Division to secure the Groesbeek Heightsbefore Nijmegen Bridge. In his analysis of the battle, Martin Middlebrook believed the "failure of Browning to give the 82nd US Airborne Division a greater priority in capturing the bridge at Nijmegen" was only just behind the weakness of the air plan in importance. Likewise, in his assessment of the German perspective at Arnhem, Robert Kershaw concluded that "the battle on the Waal at Nijmegen proved to be the decisive event" and that Arnhem became a simple matter of containment after the British had retreated into the Oosterbeek perimeter. After that, it was merely "a side-show to the crisis being enacted on the Waal". Heinz Harmel asserted that "The Allies were stopped in the south just north of Nijmegen – that is why Arnhem turned out as it did." Gavin himself commented that "there was no failure at Arnhem. If, historically, there remains an implication of failure it was the failure of the ground forces to arrive in time to exploit the initial gains of the [1st] Airborne Division". The air plan was a major weakness in the events at Arnhem itself. Middlebrook believes that the refusal to consider night drops, two lifts on day 1, or a coup-de-mainassault on Arnhem bridge were "cardinal fundamental errors"; and that the failure to land nearer the bridge threw away the airborne force's most valuable asset – that of surprise. Similarly Frost believed that the distance from the Drop zones to the bridge and the long approach on foot was a "glaring snag" and was highly critical of the "unwillingness of the air forces to fly more than one sortie in the day [which] was one of the chief factors that mitigated against success." The Allies' failure to secure a bridge over the Lower Rhine spelled the end of Market Garden. While all other objectives had been achieved, the failure to secure the Arnhem road bridge over the Rhine meant that the operation failed in its ultimate objective. Field Marshal Montgomery claimed that the operation was 90% successful and the Allies did possess a deep salient into German occupied territory that was quickly reinforced. Milton Shulman observed that the operation had driven a wedge into the German positions, isolating the 15th Army north of Antwerp from the First Parachute Army on the eastern side of the bulge. This complicated the supply problem of the 15th Army and removed the chance of the Germans being able to assemble enough troops for a serious counterattack to retake Antwerp.[175] Chester Wilmot agreed with this, claiming that the salient was of immense tactical value for the purpose of driving the Germans from the area south of the Maas and removing the threat of an immediate counterattack against Antwerp. Kershaw views the situation differently, observing that the north flank of the west wall was not turned and the 15th Army was able to escape. Dr. John Warren of the American Historical Division of the United States Air Force believed that the Allies now controlled a salient leading nowhere.John Waddy is of the belief that the strategic and tactical debate of Market Garden will never be resolved. Although a disaster for the British 1st Airborne Division, their fight north of the Rhine is considered an example of courage and endurance and one of the greatest feats of arms in the Second World War. | 


No comments:
Post a Comment